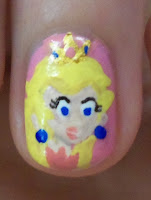
Who doesn't love Mario Kart? I painted these nails a few months ago, but they're one of my favorites. Here's a basic description of how I did them.
I painted Peach and the invincibility stars with acrylic paints, so I had to layer my paints and polishes like this:
- Base coat. This makes sure the colored nail polish isn't sitting directly on my natural nails. Strong colors can leave a stain that nail polish remover can't take off.
- Color polish. I chose Princess Peach's signature light pink in a cartoon-y matte finish. (Ulta's Heirhead)
- Glitter polish. This layer was more noticeable in person, but in the picture you can see the fine glitter on the pointer finger. It has a pink tint, but lots of colorful sparkles, especially blue. (Santee's M79 Angel Pink Glitter)
- Acrylic paint. First I mixed the colors I would need for Peach's face and collar. I used very small art brushes from a craft store for almost this whole design. I started with the shape of her head and then overlapped her hair. The eyelashes and lips were the hardest parts. I watered down my paint with water so I could have more control, but this gives a thinner coverage so I had to go over them twice. I also used watered down some of the main colors and darkened them, so I could add shadows and definition. I made her earrings with a fine dotting tool, a metal sphere attached to a grip that makes consistent dots. The crown's paint was metallic, to make it shine like a crown, and stand out from her blonde hair. Once she was done, I painted the stars in the normal "one continuous line method" and then filled them in. I thinned out my black paint so I could keep their tall eyes skinny and close together.
- Large glitter. I used a thin patches of clear polish to "glue on" craft glitter as star trails.
- Top coat. The tops coat is really important to seal acrylic paints. Without it, they will eventually be washed off with water.
