Tuesday, May 1, 2012

Pineapple Nails


These are cute, summery pineapple nails. They are an imitation of a real life pineapple except for the glittering leaves. Unlike my kiwi design, these nails feature the outside of the fruit. The length of my nails allowed me to make proportional pineapples. If they had been too short, the leaves would have been too wide.  Longer nails, however, give more options.

  1. I started out with a normal base coat to make sure my nails were not stained yellow by the polish.
  2. Next I applied one coat of yellow nail polish. It did not have to be a perfect coverage because there would be a bunch of brown lines camouflaging light spots. If anything, it would make them look more organic.
  3. I then painted a crescent moon shape of green polish just above my cuticle for the leaf portion.
  4. Then I switched over to acrylic paints and small paint brushes. I painted brown crisscross lines, starting with five lines in one direction, and then five in the other. This could also be done with brown striping nail polish.
  5. I painted the green leaves with green acrylic paint, but this step could also be done with green striping nail polish.
  6. Using a clear striping polish with green glitter, I added sparkle to the leaves. I roughly followed the dark green lines.
  7. That’s it! Then I simply added a base coat to seal in the acrylic paints and protect the design from wear. 

Pink Stripe Nails


These pink nails are a good example of chromatic color blocking. They were inspired by this post :  http://www.simplenailarttips.com/nail-art/125

The design only has pink colors, but in three different shades. I used normal scotch tape to get sharp lines between the colors. Every nail had the same design to keep it simple and symmetric. They could be considered a variation of a pink French manicure.

  1. I started out with a clear base coat to make sure that my natural nails were not stained by the colored nail polish.
  2. I then painted two coats of my lightest pink nail polish to get consistent color coverage.
  3. When those coats were completely dry, I put a piece of tape to create a sharp edge of where my next brush strokes would end. If my tape seemed too strong, I taped it to my denim jeans and ripped it off. That reduced the stickiness without totally ruining it.  I went about halfway down the nail and covered the lower half with the tape. I painted the exposed top portion with the medium pink and immediately removed the tape.
  4. Once they were completely dry, I did the same tape procedure at the halfway mark of the medium pink. I painted the darkest pink over that exposed portion, pretty much finishing the design.
  5. I finished by painting two coats of top coat. The double coat helps keep my natural nails strong and resistant to breaking and chipping. It also gives a great shine to the entire design.  

Easter Egg Nails


These nails are each their own little Easter egg. I choose pastel colors and white to imitate colored Easter eggs. Each nail was its own color, like real dyed eggs.

  1. I started off, like always, with a clear base coat.
  2. Then I painted each nail one of five Easter themed colors, yellow, purple, minty green, pink, and blue. The left hand colors were a mirror the right hand. If a polish didn’t cover completely in one coat I painted another.
  3. Then I switched over to acrylic paints and very small paint brushes.  I watered down my white paint so I could get precise lines. The watered down paint doesn’t cover as well as full strength paint, so I had to go over some lines more than once. I started with one zig zag line all the way across the nail. Then I made the same exact line a little beneath it.
  4. Then I painted two straight lines across the entire nail, one above and one below the zig zags.
  5. I used a small dotting tool to create little dots in the dips of the zigzag lines in white. The white base let me go back over the dots with all of the five colors.
  6. I used the same dotting tool to add color to the white dots. Each nail got dots in every color other than their base color. So the blue egg got yellow, purple, green, and pink dots.
  7. I sealed up the acrylic paints with a topcoat. The topcoat also helps to harden the nails and prevent he color from rubbing off or chipping. 

Stick Figure Nails


I did these stick figure nails for a friend. The pink background against the black stick figures reminded me of iTunes gift cards. The design featured happy, sad, running, and jumping stick figures. It was challenging to get the stick figures’ emotions across with so few lines. Once I figured out how to paint each one, they seemed lively and cute. Every nail also has a few pieces of glitter in the top corner.

  1. I started off with a clear base coat to protect her natural nails from being stained by the pink nail polish.
  2. I applied two coats of pink polish to make sure it was covered evenly.
  3. Then I switched over to acrylic paints and small paint brushes to paint the figures. Each figure was slightly different, but they all had heads made from a little circle. Their bodies were a straight line, and their limbs were bent to fit their activity. The stick figures on the right hand mirror those on the left hand for symmetry.
  4. I added pieces of glitter to the corners with clear nail polish. I dabbed a little bit of clear polish to act as glue. I touched a dotting tool to the clear polish so I could pick up each individual piece of glitter. Once they were in place, I covered them with clear polish to seal them in place.
  5. Then I covered the entire nail with a top coat to seal in the acrylic paints. 

Bumblebee Nails


I did these bumble bee nails for a friend to match her Halloween costume. Most of the fingers were very simple stripes, but the thumbs have shiny insect wings.

  1. I started off with a base coat to keep her nails from being stained by the colored nail polish.
  2. Then I applied a coat of white polish. My yellow nail polish was sheer, so I needed a white background to let it show through.
  3. I applied a coat of yellow polish to get the bee’s color.
  4. Then I switched over to acrylic paints and very small paint brushes to do the bee’s stripes.
  5. I used full strength black paint to do the stripes, eyeballing their width and trying to keep them level.
  6. On the thumbs, I left a bigger last stripe to look like the bee’s head.
  7. Then I did two coats of a pearly white polish in the shape of wings. While it was still dry, I attached craft glitters throughout the wings. They really made the wings look dimensional and realistic.

I dabbed over the glitters with clear nail polish to hold them in place. When they were completely dry, I covered all of her nails in a top coat with a hardener. I chose to only do stripes and not full bees on most of her nails because they were so short. Their round shape added to the bee style. 

Tropical Island Nails


Unfortunately, I was never able to get a good picture of the details of these nails. They show a little scene of a palm tree on a sandy tropical island leaning over the ocean during a sunset. This pretty much the shortest my nails could have been to pull of this whole scene without making anything too small or out of proportion.

  1. I started out with a base coat to make sure my nails weren't stained by the colored nail polish.
  2. I then applied one coat of white nail polish to give me a blank canvas for the colors of the scene. Painting onto a white base lets me use much less polish to get vivid colors.
  3. Next I made a gradient between yellow and pink for the sunset sky. I used a kitchen sponge cut up into pieces to dab on both colors and blend their border until it was an even transition.
  4. I carefully painted the light blue ocean with normal nail polish, making sure I didn't cover up too much of the yellow.
  5. The rest of the color was painted with acrylic paint and small paint brushes. I started by adding the tiny sandy island to the very base of my nail. I used a much barker brown to make the skinny trunk of the palm tree. Then I turned my hand over and painted the green palm leaves upside down. This way they were a little more organic looking and didn't all look exactly too perfect.
  6. Then I went back over the ocean portion with streaks of light and dark blue to make it look more like the moving water of the ocean.
  7. I created setting suns with individual craft glitters attached with clear nail polish.
  8. I sealed in the acrylic paint with a topcoat. 

Rhinestone Flower Nails


I painted these red nails to match my prom dress. You might not be able to tell from the picture, but the flowers were made completely of rhinestones. Together with the glitter base color, these nails were very sparkly and caught a lot of light.

  1. I started with a thorough base coat to make sure my natural nails wouldn't be stained by the bright red polish that would come next.
  2. I used two coats of red polish that had a fine glitter in it. The second coat made sure the glitter and color both covered evenly over the whole nail.
  3. I used white acrylic paint to create the stems and curling petals of the flowers. The flower end of the stems didn't have to be perfect because I knew I would be covering them up with rhinestones.
  4. I used a dab of clear nail polish as a glue to attach one red rhinestone to the approximate middle of the flower. Then I surrounded that with more clear polish and laid down clear rhinestone around the red one in a circle. This created the shape of a flower for me.
  5. I went over the cluster of rhinestones with topcoat and gave them plenty of time to dry. They tend to shift on the curve of the nail until they're completely dry, so I had to be very careful not to disturb them. Then I covered the entire nail with topcoat. 

Kiwi Nails


These cute nails look just like the inside of a kiwi. It’s a pretty simple concept but the many little details made this design interesting. The main features of a kiwi’s appearance are the green fruit color, the white core, and black seeds. I didn’t include the furry outside of the kiwi because this design only showed the inside flesh of the fruit.

  1. I started with a basic base coat to protect my natural nails.
  2. Next I applied a coat of my green kiwi color over my entire nail.
  3. For the white core, I switched over to acrylic paints and very small paint brushes.  I actually started with the white lines around the outside of the nail. I watered down my white paint so I could get precise skinny lines. Because the paint is thinner, I had to go over many of the lines twice to get full coverage.
  4. Next I used full strength paint and a larger brush to fill in the space between the lines. This created a fairly even but organic looking shape for the core.
  5. I made seeds using black paint and a very small dotting tool and made rows of dots down the rows made by the white stripes.
  6. That’s it! I finished off with a top coat to seal the acrylic paints and protect the design. 

Neon Pink Nails


These nails were very bright in person. The neon pink polish was bold and eye catching and the white dotted tips were bold to match. On each finger one of the white dots was overlapped by a white craft flower that’s almost like an oversized piece of glitter. This added a little extra interest to a simple design, and brought light to an otherwise matte surface. The flowers give a little bit of texture, but can be a hassle to have on your nails. Even though they’re secured with clear nail polish, they can get caught on hair or loose fabric. I still liked them, but I wished I could have known about this problem before I was committed to wearing them.

  1. I started off with a normal base coat. I made sure not to miss any spots because the pink base color would easily stain my natural nails underneath. 
  2. Then I applied two thins coats of a neon pink. Two thins coats gave me a consistent color coverage overall.
  3. Next I used a large dotting tool to create the dotted tips. I started with the top layer of dots spaced comfortably apart.  Each dot in the next layer fit in the window created by the original dots.
  4. Then I used a small dab of clear nail polish onto the dot that would be overlapped with a flower. The clear polish acts as glue, and when I placed the flower on top, it stayed in place.
  5. I then applied topcoat just over the flower to seal it in place. When that was completely dry, I covered my entire nail with top coat to seal in the acrylic paint.

Purple Flower Nails


These purple flower nails were inspired by a Robin Moses design. They feature multi-toned purple flowers. The flowers lie over a backdrop of silver swirls and black base.

  1. I started with a clear base coat, being especially careful to cover mu entire nail. Any missed spots will be stained by the black polish in the next step. I made sure to cover the free edge of my nail so I could also cover it with black.
  2. Next, of course, I painted two coats of normal black nail polish.
  3. Then I switched over to acrylic paints and small paint brushes for the rest of the design. I choose a metallic silver paint to go under the flowers so they would shine in the background. I tried to make medium sized swirls, so it wouldn't seem too busy, but could also clearly look like swirls under the flowers.
  4. I started the flowers with the darkest purple paint, and made rough petal shapes until I was happy with each overall flower.  Then I added some white paint to the purple I was working with, and used that color to add swipes of lighter color to the insides of the flowers. This makes them much more realistic and dimensional.
  5. I finished off the flowers with black centers to tie into the black base color.
  6. The very last step was to add a shiny clear topcoat.  My topcoat has a harder in it to help keep my nails strong. And, like any topcoat, it seals in the acrylic paints and prevents the polish from being scratched off onto paper or white walls. 

Snowman Nails


I had to wait for my natural nails to grown nice and long to paint this design. The backdrop to this scene is a snowy New England forest. The length let me show a full landscape, with a snowy foreground, and full set of treetops. It also gave me plenty of room to paint the snowmen large enough to be detailed.

  1. As usual, I started with a base coat.
  2. Then I painted one coat of navy blue polish to act as the dark sky.
  3. Next I used white acrylic paint and a wide brush to create the snowy ground. 
  4. I used a much more tapered long brush to create each branch in the trees. I added some white snow to the trees to make it more realistic.
  5. Once the trees were done and dry, I filled in the sky with the smallest white dots possible. This created the look of falling snow.
  6. The snowmen on each ring finger were made by creating three large white dots, just as you would a real snowman. I chose a red color for the scarf and hat so it would stand out from the background. To give dimension to the hat and scarf, I mixed that red with some white to create a lighter color that matched well. That color acted as the brim of the hat.
  7. I used a tiny paintbrush instead of a dotting tool to make the black eyes and buttons.
  8. Once those steps were done, I could finish up with a top coat, making sure to cover the free edge of my nails. Having that extra rim of protection helps avoid chips and scratches of nail color. 

Tinkerbelle Nails

Sorry for the bad picture quality.

I painted these nails to match a Tinkerbelle Halloween costume. The light green and yellow colors remind me of the Disney image of Tinkerbelle, while the glitter reminds me of the stage representation of her as a ball of light. The white swirls and dots add interest and make the design more fairy-like.

  1. First I applied a normal base coat to protect my natural nails from being stained by the colored nail polish.
  2. Second, I applied a single coat of white nail polish, not worrying about how messy or even it was. The white base makes the lighter colors in the next step more vibrant, making it take less polish to cover. Gradients are much easier when you don’t have to worry about coverage.
  3. Using a kitchen sponge cut up into cubes, I dabbed on patches of yellow and green. I overlapped the two colors in the middle and blended them together until I got an even gradient.
  4. Then I switched over to acrylic paints and very small paint brushes. I watered down white paint to get the flexibility I needed for the swirls. I made random large swirls, starting from the edges and then painting backwards from the inside of the swirl. I played around with holding my hand in different positions to find the best angle for each individual swirl.
  5. I added dots with a dotting tool around the outer edges of swirls to fill up more space and make everything more symmetrical.
  6. I added a glitter polish over the entire nail, and then a topcoat for shine. 

Monday, April 30, 2012

Simple Flower Nails


These are really simple flower nails. I made this design to camouflage shorter nails. The vertical line of flowers makes them seem taller. I kept the flowers small to make the pink nail seem bigger in comparison.  A bold color like this pink really shows off the shape of the nail, where a white tip or solid light color doesn’t emphasize the end of the nail.


  1.  I started off with a normal base coat of clear nail polish.
  2. Second, I did two coats of a bright pink polish, making sure to coat the free edges so I don’t miss any length. This will also prevent chips that would take away from the bold shape of these nails.
  3. The next step requires a dotting tool, a metal sphere attached to a handle for easy use. They come in lots of sizes, and for this I used a small sized dot. When you dip the dotting tool into polish or acrylic paint, it picks up a perfect circle of color. If you push the tool farther in, it will pick up more, and be able to transfer a bigger dot. If you barely touch the tool to the surface, it will transfer a small dot. The same is true when you touch the tool to your nail. The closer you get to the nail, the more color will be transferred. After practice, you can get very uniform dots. I made flowers out of five dots, with one dot in the middle. Alternating between white and black petals let me stack the flowers right on top of each while keeping them clearly separate.  
  4. I finished with two coats of topcoat for extra protection and shine. 

Blue Nails with Silver Banner


These blue nails with their silver banner were very rich and fancy. The deep blue reminds me of dark velvet and the swirls and flowers remind me of royalty. It may not be visible in the picture, but the silver swipes are filled with black swirls, and paralleled by small black dots. At the end of each line of dots there is a white dotted flower with a black center.

I started with a clear base coat to protect my natural nails.
Next I painted two coats of deep blue nail polish.
Once that was dry I applied silver nail polish in a swipe across the middle of the nail. I needed a second coat of silver to cover up the strong blue color.
I then switched over to acrylic paints and small paint brushes to do the black details.
It was important to me to thin out my black paint with water so I could get the thinnest, most precise lines possible. I tried to keep the swirls consistent sizes so it would look like old fancy fabric. After trying a few methods, I found the best way to paint a spiral was to branch off from the edge to begin, and then start again at an inner layer of the spiral. Otherwise I would get spirals that were more oval than round. Again, it was critical to thin down the paint enough to have strong defined spirals.
The flowers were also made with acrylic paint. A dotting tool is a small metal sphere attached to a handle similar to a brush handle. The sphere picks up paint in a perfect little dot so it can be transferred to the nail. I made five white dots and then one black dot in the center. 

Teal French Manicure


These nails are a unique French Manicure with teal waves. My natural nails were too long for a normal and balanced French manicure, so I added a teal swirl portion and put the design at an angle (just because).

  1. I started with a base coat to protect my natural nails from staining.
  2. Next I used a transparent pink that just barely shows on top of my nail bed. This gives my nail bed a healthy pink color without making them look artificial.
  3. I made the white scallops with the normal brush of white nail polish. After that was dry I copied the curves with a smaller teal wave.
  4. The swirls are painted with black acrylic paint that I watered down so I could get thinner, more precise lines. I followed the border of the white and teal to define the colors, and added swirls as interesting decoration. The dots on the outer end of the white “French” manicure do the same by breaking up the border between the white and natural color. 
These nails were a fun way for me to keep my natural nails long and still have a half painted style. A normal french manicure would have left an awkwardly large white tip. I like the unusual splash of teal color, and vague resemblance to ocean waves. 


Palm Tree Nails


Here’s another set of summery nails. This design features reaching palm trees over a calm summer background. I like gradients for summer designs, and they’re a great way to put a little more effort into nails, and get a lot back in reward.


  1.  I applied a normal base coat to protect my natural nails from staining. 
  2. When the base coat dried, I applied one coat of white polish. This doesn't have to cover evenly because it will be covered up in the next step.
  3. Start the gradient at the free edge of the nail with a light blue nail polish. Cut up a kitchen sponge or use a makeup sponge to dab color onto the surface of your nail. Blend the colors up through green into orange.
  4. Next I used a small paint brush and brown acrylic paint to create the two curved trunks of the palm trees on each nail. I made sure that their bases were slightly wider than the tops. The palm leaves were a darker green paint than the background polish, and branched off in a stereotypical palm tree pattern from the trunks. 

These nails look like they’re filled with lazy palm trees stretching out in the breeze. The background colors could easily be switched out with sunset colors such as pink and orange. Or they could be switched out for bright blue and yellow for a daytime scene. 

Monarch Butterfly Nails

Sorry for the bad picture quality


These nails are meant to give the illusion of fluttering butterfly wings. I saw some pink and blue butterfly nail designs on YouTube, so I decided to try my own in the realistic orange colors. These nails really ended up looking like wings and the combination of bold colors made these nails stand out.


  1. I applied a base coat as always, to protect my natural nails from staining.
  2. I painted the base half of my nail in light yellow and the other half in orange. I used a cut up kitchen sponge to blot and blend the two colors together seamlessly, bringing the orange up past the middle line. 
  3. Then I used a very small paintbrush to apply black acrylic paint to the curve of the base of my nails. I added more curved black lines to imitate the lines on a butterfly’s wings. The black base connects the lines and acts as the dark edge of the wings.
  4. I used a small dotting tool to apply the dots of white paint. This step really makes the design look realistic and bright.  I made sure to position the dots in a swipe up the side of the nail to imitate the curved shape of butterfly wings.  


The long length of my nails helped allow me to get a good shape for butterfly wings. If they had been shorter they would have looked more square and reach out less like a butterfly. All ten nails together looked like a swarm of little monarch butterflies. 

Bali Mango Nails

I was inspired to paint this nail art design by my favorite lotion. Bath and Body Work's Bali Mango smells like, wait for it... mangoes, and is my exact idea of what a carefree summer smells like. These flowers are a little abstract and only painted in a black outline. I chose to make a gradient of color over the whole nail so the design would be colorful even from far away.

  1. Normal base coat and one coat of white polish. I find white nail polished hard to deal with, but even though it wasn't perfect I knew i was going to cover it up in the next step. 
  2. To get ready to make a gradient, I taped the sides of my nails with scotch tape. This way I could work quickly enough to mix the nail polishes, and not worry about being too messy.
  3. Using a kitchen sponge cut up into cubes, I dabbed patches of pink nail polish around the base of my nail. The gradient effect is created by using a small amount of two neighboring colors on their borders and blending them together until it looks like a smooth transition.
  4. I painted large flowers with a just black outline and added some dots for decoration.  
  5. Two coats of top coat to protect the acrylic paints and give a lively shine. 
The over sized flowers and bright colors of this design really remind me of summertime fruity smells. The gradient took extra time, but it was worth the effort to have soft, seamless transitions.

Windmill Nails


Here are some springtime nails painted with windmills over a backdrop of flowers. They are inspired by a Robin Moses nail art design of a clouded blue sky with orange flowers. I have similar flowers and added some windmills (obviously). I think the windmills bring these nails from a generic springtime scene to more of a fairy tale or dreamlike scene.


  1. Base coat and pearly blue solid background.
  2. Everything else was done with acrylic paints. First I diluted white paint with lots of water and painted very rough watery clouds. I went back over them in different sections to build up random portions to give the clouds more dimension. 
  3. I painted the grass from the end of my nail up towards the middle in flicking strokes. I partially overlapped dark blades with lighter green to give the look of a real meadow of grass and steams. 
  4. Next I painted the flowers. The darkest orange gave an outline to the petals and a base for the lighter colors. I used progressively lighter shades of orange towards the centers, and finished them off with dots of bright yellow in the centers. The flowers on the ring fingers were much smaller to leave room for the windmills and show a more realistic scale.
  5. I made a rough shape of a tower in brown and expanded the sides until I was happy with it. The roof is a darker brown and the sails are much lighter and have a black outline to define their iconic shape. I added windows and doors to make the windmill more realistic and recognizable.
  6. Clear top coat of nail polish to protect the acrylic paints. 


One thing I disliked about this design was that they didn’t have a big appeal from far away. There is so much “going on” that they look like a blur. I like how they were clearly a scene or a painting from up close, but my favorite nail art designs look great from any distance.

Saturday, February 4, 2012

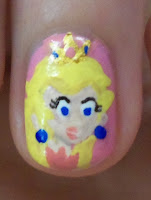
Princess Peach

 
Who doesn't love Mario Kart? I painted these nails a few months ago, but they're one of my favorites. Here's a basic description of how I did them.


I painted Peach and the invincibility stars with acrylic paints, so I had to layer my paints and polishes like this:


  1. Base coat. This makes sure the colored nail polish isn't sitting directly on my natural nails. Strong colors can leave a stain that nail polish remover can't take off. 
  2. Color polish. I chose Princess Peach's signature light pink in a cartoon-y matte finish. (Ulta's Heirhead)
  3. Glitter polish. This layer was more noticeable in person, but in the picture you can see the fine glitter on the pointer finger. It has a pink tint, but lots of colorful sparkles, especially blue. (Santee's M79 Angel Pink Glitter)
  4. Acrylic paint. First I mixed the colors I would need for Peach's face and collar. I used very small art brushes from a craft store for almost this whole design. I started with the shape of her head and then overlapped her hair.  The eyelashes and lips were the hardest parts. I watered down my paint with water so I could have more control, but this gives a thinner coverage so I had to go over them twice. I also used watered down some of the main colors and darkened them, so I could add shadows and definition. I made her earrings with a fine dotting tool, a metal sphere attached to a grip that makes consistent dots. The crown's paint was metallic, to make it shine like a crown, and stand out from her blonde hair. Once she was done, I painted the stars in the normal "one continuous line method" and then filled them in.  I thinned out my black paint so I could keep their tall eyes skinny and close together.
  5. Large glitter. I used a thin patches of clear polish to "glue on" craft glitter as star trails.
  6. Top coat. The tops coat is really important to seal acrylic paints. Without it, they will eventually be washed off with water.